
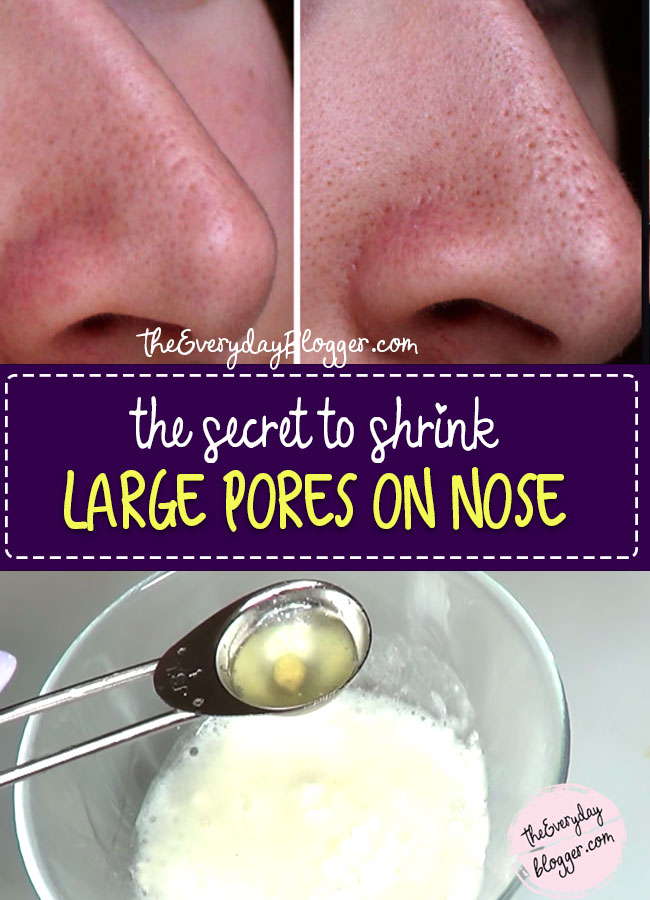
As much as I try to embrace my skin’s natural texture, there’s one aspect of it I just can’t accept: my large pores because unlike stress zits, we’re stuck with our pores forever.
The good news is that although your base pore size is genetically determined, you can minimize their appearance and effectively shrink them back to their normal, pre-stretched state with the right treatments.
How To Clean And Unclog Nose Pores
The first step to resolving nose pores is to make sure they’re clean. Oil, dirt, and makeup can lead to clogged nose pores.
Here’s a fact: Pores are a structural part of your skin that cannot, under any circumstance, be removed. They can, however, get wider and deeper if they’re constantly clogged, or if you squeeze them all the time.
Step 1
Remove All Makeup Before Bed
- Wearing oil-free, noncomedogenic products don’t give you a pass for bedtime makeup removal.
- Even the most skin-friendly makeup products can clog your pores if you leave them on overnight.
- Your first step to unclogging nose pores is to make sure they’re cosmetic-free before going to bed.
- You should also remove makeup before washing your face to make sure the cleanser can work in your nose pores more effectively.
Step 2
Cleanse Face Twice a Day
Cleansing removes any leftover makeup, as well as oil, dirt, and bacteria from your pores. Ideally, you should do this twice a day.
You might need to cleanse again during the day after you work out, too.
Oily skin is served best with a gentle cleanser that’s either gel- or cream-based.
These will help to clean out nose pores without irritating them, thereby making them even more noticeable.
Step 3
Use the Right Moisturizer
Even though your nose pores might be making more sebum, you still need to follow up each cleanses with a moisturizer.
This prevents any over-drying that can worsen nose pore issues. Look for a water or gel-based product that won’t clog your pores.
Check out some of the best facial moisturizers on the market.
Step 4
Deep Clean your Pores with a Clay Mask
Clay masks help draw out plugs in your pores and can also help give the appearance of smaller pores. For best results, use two to three times per week.
If the rest of your face is on the dryer side, feel free to use the clay mask on your nose only.
READ: Unbelievably Fix for Oily Skin
Step 5
Exfoliate Dead Skin Cells
Use an exfoliating product two to three times a week to help get rid of dead skin cells that may be clogging your pores.
The key here is to massage the product onto your nose and let the product do the heavy lifting — scrubbing the exfoliant into your skin will only cause further aggravation.
Read:4 Ways to Exfoliate Your Skin
How To Make Nose Pores Appear Smaller
Despite keeping your nose pores clean, genes, environment, and your skin type may still make them more noticeable.
Consider the following treatments that may help your nose pores appear smaller. (Note that it can take a few weeks or longer to see full results.)
Here’s The Facial Mask That Works Effectively On My Pores
You’ll Need :
- 1 tbsp Lemon Juice
- 1 tbsp Raw Milk
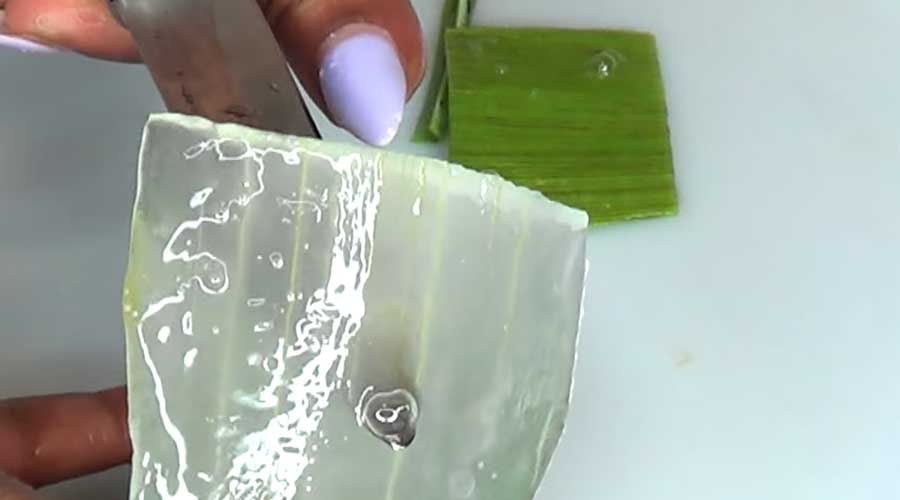
- 3 tbsp Fresh Aloe Vera Gel
- 3 tbsp Rice Flour or ChickPea Flour (or Besan flour)
Directions :
① First, cut the fresh aloe vera leaf (about 2 inches) and extract the gel.
Just cut both sides and slide the knife right under the aloe vera (on top of the gel) and do the same at the bottom part.
② Next, place the gel in the blender and blend. Set aside.
③ In a separate bowl, place 3 tbsp of flour, add 1 tbsp of milk, 2 or 3 tbsp of aloe vera gel and 1 tbsp of lemon juice.

④ Now, mix them all together, making sure to get all the lumps out until you’ll come up with a paste-like consistency.
⑤ Apply the mixture on your freshly wash/cleanse face using a brush. Don’t forget to apply also on your neck or décolleté area.

⑥ Let it sit for 30 minutes. you can store the leftover in the fridge and use it within 3 days.

” You build on failure. You use it as a stepping stone. Close the door on the past. You don’t try to forget the mistakes, but you don’t dwell on it. You don’t let it have any of your energy, or any of your time, or any of your space. ”
Credit: Khichi